Tuesday, 15 January 2013

Here are some pictures of my progression creating a hand, arms and eyes.

For the hand I only gave it three fingers to keep it as a simple avatar I created the hand and eyes by following the same tutorials I had used previously. Next I will make eyelids to cover the gaps around the eyes, ears and the insides of his mouth.

Today I touched up my characters head and created a basic avatar style body for him, the head is purposely out of scale with the body as all avatars have unusually massive heads because it is the main part of the character.

First I used the soft select and mirror tool in order to neatly scale in the size of my characters nose.
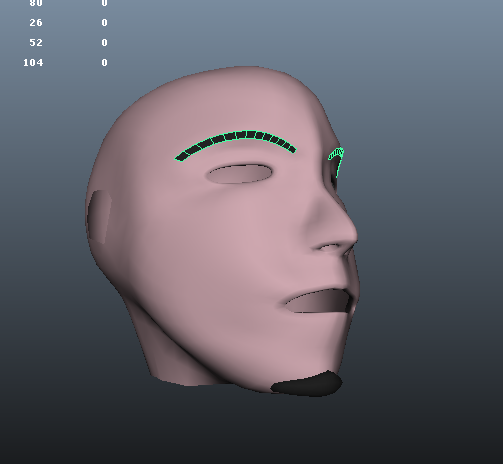
Then I added some facial hair, I created the goatee from a new shape to give it some thickness, and I copy pasted some polygons in my characters eye brow location in order to make the eye brows. Then I gave them all a dark brown color and also colored his skin. I may come back to this once my character is complete and create a realistic hair texture and bump map to improve its quality.
I created hair for my character the same way I made the eye brows and then added some spike shapes to the edges of the hair.
Then I created a quick and basic body shape for my character before smoothing it and realigning the polygons how I wanted them.

Then I deleted unnecessary polygons that would be covered up by other objects in order to reduce my poly count where possible, and to recreate a neater back neck for my character.
Then I added some simple textures to his cloths. Next for my character I need to make ears, arms, hands, eyes, mouth and feet and then connect them as efficiently as possible avoiding triangles in my topology like the plague. Then these final objects must be textured and I will consider using bump maps on any of my existing objects. Once my character is complete I will bring in my grassy hill from my other character for this avatar to stand on and then decide if i need to rig and animate him or not depending on my time left over and requirements for my main model.

For my main character I still need to weight my bones for animation, animate him, repair the Ncloth  and recreate an improved background.


Saturday, 12 January 2013

Today I created my head for my basic avatar, I think I may have over done it again, by using too much detail but I didn't want my avatar to have a bad head. I followed the same head modeling tutorial for this avatar as I did for my main character here is a link to the tutorial.
http://www.youtube.com/watch?v=xls25e08sSg


And here are some pictures of my progression, for this design I decided to make the avatar of my self to save time making designs.

I ended up improvising for after I had got half way through because my pictures didn't line up perfectly, this means the head is not exactly the same shape as my face but it still passes for a human head in my opinion. If I was going to do this again I would spend more time in Photoshop lining up my reference images. Next I will make a cartoon styled body for my avatar, this will require some proper designs, which I will make in flash.

Friday, 11 January 2013

Here is the progress of my bump map which I decided to include in order to aid the quality of my grass texture.

First I followed a tutorial in order to find out how to create a bump map image using Photoshop. Here is the bump map I produced.


Then I followed another tutorial in order to learn how to apply bump maps to textures and how to edit and adjust them to look as good as possible. Here are some screenshots of me applying and adjusting my bump map until I was happy with the result.

At first the bump was a bit to strong and didn't look much like grass so I played around with a few settings and make it more realistic.
Here is my final grass bump map, and here are some links to the tutorials I followed.

Photoshop Bump Map Tutorial:
https://www.youtube.com/watch?v=RY6OH_o8krw

Maya Bump Map Settings Tutorial:
http://www.youtube.com/watch?v=LkAITCwumns


Some work I plan to do in upcoming weeks are:

Bump Map Grass - This will improve my current grass sphere.
Remake Avatar    - I will make a new and more basic avatar to use for my first task.
Rig Weights         - This will help when it comes to animating my complex character.
Ncloth                  - I need to make sure my Ncloth works and can be animated.
Animate               - I will create an animation for my complex character.
Background         - I will move my grass sphere to my basic character and redo a better background for the complex character.

Saturday, 5 January 2013

Today I restarted my character rig because the original rigging tutorials I was following where not the best and I found some much better tutorials. I instead followed a 6 part tutorial made by Russel Stasiuk on Youtube starting with : http://www.youtube.com/watch?v=UwNDoyZbsCQ

These tutorials are better because you are given more warning about the future effects of modeling decisions, I didn't notice any mistakes, its clear to follow and a less annoying voice. Here are some screenshots of my rigging production.
Firstly I found out that having a bend in my models knees was a big mistake as this can lead to unusal results when creating IK handles, so I went back to my legs and begin to straighten them out by selecting rings of vertices and using the soft select tool to keep it smooth.

I then moved on creating more bones for my whole character since my arms where down I just made the rig above it and will move them together in position once the control's are complete.

Here is my complete bone structure.
Once my structure was complete I check the orientation of all my joints and begin to adjust them, so they all matched up correctly.
I then created some foot controls, I also added an attribute to these controls allowing me to move the foot, I can use this for future walking or running animations if I ever need them.
Then I created some knee control's using Pole Vectors, I then edited these controls so they will not show up in renders, and only display the necessary attributes.
I then made the hip controls and connected it to the relevant bones so they all move and rotate together correctly.
Next I made a back control using multiple tools such as spline clusters, additional attributes, connection editor, key drivers and much more.
Then I created a head controller using all the same technical shizzle wizzle, and began to make some arm controllers.
Here is an image my final rig all finished I also added a rig to the eyes and added my head mesh as a child of the bones so it is animated correctly, the arms and hands are also rigged up and the hands have newly made attributes that allow me to make a fist shape using a single attribute, this will be helpful for gripping the sword if I decide to do any animations like that, I had to use multiple scrips that I learned from the tutorial videos in order to produce these attributes and do other handy functions in Maya.

I also decided to use a different tutorial for the eyes, I used it because it seemed easier for my unique type of eyes, below is a link to the eye controller tutorial I used.

http://www.youtube.com/watch?v=pdZl6tLjfdE

The next thing I need to do is either move the arms rig to line up with the mesh arms or the other way around and then bind my skin to my bones and hope it doesn't go crazy.

Wednesday, 12 December 2012

Today I created my sword to add to my characters island, I really enjoyed doing this as I didn't expect to be able to create such a nice looking weapon. First I made my side and front view designs in Flash then I began creating the object in 3D in Maya. It took quite a long time to do but I am very happy with the results, when I made this weapon I think I may have sub divided it too many times, but I really wanted the curves to have a good quality and not a block look, I settled on the high quality and high poly count because I for a movie and not a game its not too big of a problem. However is this object was to be a live item in a game I would definitely undo the last two subdivisions to half its poly count and make it lightweight. Once I had the object complete in Maya it had a really evil feel to it so I decided to change the color scheme of my design slightly and make it all metal with a dark metal handle rather than wooden. Below are some screen shots of my work in progress.

 Flash designs.
Maya production
And there is my final complete quality sword.