Saturday, 26 January 2013

Today I created a background image for my animation, I repaired my Ncloth, I created some lights and I rendered an animation to use as my final animation. As I was running out of time I did this quickly and the animation is rather short and not extremely exciting, so I will I will choose modelling as my speciality for this project or which ever area of the work I have done best at. I will try to complete everything tonight and then tomorrow I may have a go at improving my animation and re-rendering with any improvements I can think of.

The first thing I did was create the environment for my animation, upon reviewing a tutorial on how this is done I found that most of the work is in the pre production and texture of the background so I began design a few cliff walls in Flash.


When I created this I was sure to make each side of it match up so the image can tile incase I choose to do a three sixty camera spin in Maya, to do this I copy pasted one edge, I then flipped it horizontally, repositioned it and matched up the edges to fit the connecting cliffs.


I then added details and colour to my image as well as some sky.


Then I copied my image in to Photoshop and changed the offset in order to test how well the repeat tile effect works, and it turned out to work perfectly so I then saved it as a high quality jpeg to use as my texture.

Next up i followed a Youtube environment tutorial (link at the bottom of post) and created a dome to contain my animation and display my background texture I also added an image plane at the bottom to fill the gap between my grass hill and the background image.


Then I applied my texture, I adjusted the UV map in order to help my texture align correctly and I checked out how it looked.


I was not happy with how this first looks because the edge from my grass to my background is far to clear so I decided to edit my background image and add my grass texture to the grass below the cliffs in order to create a much better blend between objects.


As you can see I copy and pasted my grass texture on to a new layer and then duplicated it until it covered the lower part of my image, I then cut out the edges and deleted the top part of the grass so it was only on the lower part of the screen. I then put the opacity back to 100% and faded it on by converting it to a layer mask. This covered up the hill lines and gave me a slight problem so I soloed my background layer and colour range selected the black lines, and copy pasted them in order to place the black hill edge lines on top of the grass texture. Then I saved the file and checked the changes in Maya.

Youtube background tutorial:

http://www.youtube.com/watch?v=I1bViYb5WJY

Wednesday, 23 January 2013

Today I did a few things, I first tweaked the join weights of my main model, I couldn't really get my head around this so I did it for the bones that affect my animation and then tweaked them where I saw issues rather than perfecting the whole model.

Then I made a simple animation for my main character after following a simple tutorial on maya animations.

Next I finished of my avatar character by creating his ears and adding a floor for him to stand on, for the floor I used the same grass texture and bump map as I used in my main character grass stand.

Unfortunately this website is giving me some technical difficulties at the moment so I will upload screen shots of this later if I can.

Tomorrow or later I will begin creating my main characters back ground I plan on finding a good tutorial to help me use some effects in order to make the background appear far in the distance at high quality, I also plan to make it as a cliff edge with some sky behind it with my character stood on the hill in the foreground. After this I will work on the lighting, cameras and rendering before Friday.


Friday, 18 January 2013

Today I finished patching up all the details on my avatar I knew as soon as I started doing this I could have spend all day on a small part trying to perfect it so I tried to make sure I didn't do this in order to save time by quickly moving on to the next part after I had finished the eyelids. I made the eyelids, teeth and mouth panel.

Here is the start to my eye lids, I then smoothed and added a color and also deleted the back faces that are out of view in order to reduce file size via lowering the poly count.
Then I added a simple shape for the teeth.
Then I added a plane inside the mouth to make the character more realistic.
Next I just need to create a floor for my avatar to stand on and then do some animation and complex work on my main character.


Thursday, 17 January 2013

I created some simple boots for my avatar, the only final stages left now are the extra details around its face.


Tuesday, 15 January 2013

Here are some pictures of my progression creating a hand, arms and eyes.

For the hand I only gave it three fingers to keep it as a simple avatar I created the hand and eyes by following the same tutorials I had used previously. Next I will make eyelids to cover the gaps around the eyes, ears and the insides of his mouth.

Today I touched up my characters head and created a basic avatar style body for him, the head is purposely out of scale with the body as all avatars have unusually massive heads because it is the main part of the character.

First I used the soft select and mirror tool in order to neatly scale in the size of my characters nose.
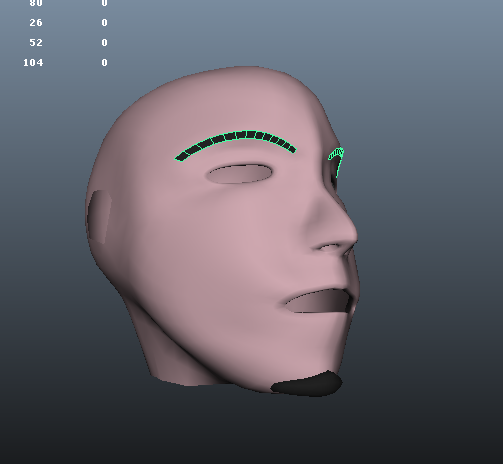
Then I added some facial hair, I created the goatee from a new shape to give it some thickness, and I copy pasted some polygons in my characters eye brow location in order to make the eye brows. Then I gave them all a dark brown color and also colored his skin. I may come back to this once my character is complete and create a realistic hair texture and bump map to improve its quality.
I created hair for my character the same way I made the eye brows and then added some spike shapes to the edges of the hair.
Then I created a quick and basic body shape for my character before smoothing it and realigning the polygons how I wanted them.

Then I deleted unnecessary polygons that would be covered up by other objects in order to reduce my poly count where possible, and to recreate a neater back neck for my character.
Then I added some simple textures to his cloths. Next for my character I need to make ears, arms, hands, eyes, mouth and feet and then connect them as efficiently as possible avoiding triangles in my topology like the plague. Then these final objects must be textured and I will consider using bump maps on any of my existing objects. Once my character is complete I will bring in my grassy hill from my other character for this avatar to stand on and then decide if i need to rig and animate him or not depending on my time left over and requirements for my main model.

For my main character I still need to weight my bones for animation, animate him, repair the Ncloth  and recreate an improved background.


Saturday, 12 January 2013

Today I created my head for my basic avatar, I think I may have over done it again, by using too much detail but I didn't want my avatar to have a bad head. I followed the same head modeling tutorial for this avatar as I did for my main character here is a link to the tutorial.
http://www.youtube.com/watch?v=xls25e08sSg


And here are some pictures of my progression, for this design I decided to make the avatar of my self to save time making designs.

I ended up improvising for after I had got half way through because my pictures didn't line up perfectly, this means the head is not exactly the same shape as my face but it still passes for a human head in my opinion. If I was going to do this again I would spend more time in Photoshop lining up my reference images. Next I will make a cartoon styled body for my avatar, this will require some proper designs, which I will make in flash.