Today I worked through more of the tutorials and learned a few more basic but handy tools and techniques in Maya. I did the techniques from six to ten and here is a video of my results.
http://www.youtube.com/watch?v=tGd-oHKoyZ0
Monday, 29 October 2012
Saturday, 27 October 2012
Today I worked through some of the tutorial videos in order to demonstrate and develop my understand of the different tools and techniques available in Maya. Below is a link to a recording of me using these tools and techniques in Maya.
http://www.youtube.com/watch?v=Xe-3GY1ByP0
http://www.youtube.com/watch?v=Xe-3GY1ByP0
Thursday, 25 October 2012
Today I progressed the production of my final character. I used many tools to do this here is a list of some of the tools I used: Layer Controls, Extrude, Insert Edge Loop, Split Polygon Tool, A range of different select modes, all the basic control tools (move, rotate, ...), Merge to Center, Duplicate, Attribute editor, Smooth and a few others.
And here is a video displaying the different stages of production for my character and a display of how it looks at its current state, via Youtube link:
http://www.youtube.com/watch?v=zZtcNhTX_D4
Before I continue working on my character I will complete some of the tutorials that have been provided to us. I will do this to get a better understanding of Maya and learn some new tools and techniques that will hopefully allow me to create a higher quality character.
Thursday, 18 October 2012

Monday, 15 October 2012
Today I created the back and side views for my character so I can begin creating it in Maya. I still need to add a few details to the designs but I could begin working in 3D at this stage as I have the layout complete and correctly scaled. I used rulers to keep the different angles to the correct scale and copy pasted the back view from the front view to keep the proportions correct before changing it appropriately. I also plan to redo the hands, boots and maybe the head design.

There is a video for the design stages of this work at following Youtube link:
http://youtu.be/FYtgRLPahmg
There is a video for the design stages of this work at following Youtube link:
http://youtu.be/FYtgRLPahmg
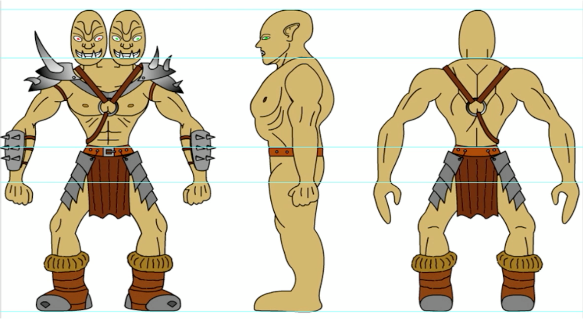
Friday, 12 October 2012
Today I created a character design in flash in order to trace the shapes in Maya later on. The next thing I need to do is created a side and back view for the same character. When I make these views I will need to ensure I keep all parts of the character to the exact same scale as my front view image. By doing this it will make it easier to create the image correctly in Maya while tracing my designs. I will also keep the individual layers on my flash designs so I can build up the character layer by layer in 3D the same way I did in 2D, this will make it easier to add the amour on top of a character and help me know what shape it should be under the armor.
Here is an image of my final front view design:

Here is a link a Youtube video displaying the different layers and design stages I went through in order to create this character:
http://www.youtube.com/watch?v=uZgUIe1f5tQ
Here is an image of my final front view design:

Here is a link a Youtube video displaying the different layers and design stages I went through in order to create this character:
http://www.youtube.com/watch?v=uZgUIe1f5tQ
Sunday, 7 October 2012
The first thing I decided to do in order to make a start at
this project was to figure out how I want my character to look. In order to do
this I will first research some Orc monsters online to see how different
existing character look. I will then create my own designs for an Orc in flash
ready to be traced and created in Maya.
Below are a few images I took a look at to help me figure
out how I want my character to look.
Image found at: http://metin2-us.wikia.com/wiki/Chief_Orc

Originally I was planning on making a single headed
character but after seeing this image I decided a two-headed one could look
much better.
This image shows the style of armour I was planning on making
for my character, I want the Orcs in my game to have a tribal rugged leather style
of armour to show primitive knowledge and give them stronger characteristics.
Some ideas I had to enhance this are to use random real world objects as
armour, for example a stolen bowl as a helm or a horse’s saddle as a shoulder
guard.
Image found at: http://powerlisting.wikia.com/wiki/Orc_Physiology

This following image shows the type of proportions I was
planning to use on my Orc, only with less armour. So I will use this as an
initial proportions guide when designing my own character.
Image found at: http://www.polycount.com/forum/showthread.php?t=50943

Now I have a few good examples and a stronger idea of how I
want my character to look I can begin my initial designs.
Wednesday, 3 October 2012
After reviewing the module requirements I have a few ideas about what
I will do for my project. I was happy to hear we can use the files that
we produce from this module in our major project as part of another
module, so I plan to do this in order to progress multiple modules at
the same time.
As we are required to create a 3D scene and character this is a perfect opportunity to create an improved version of my main menu for my major project. For my major project I have given myself the task of creating a flash game that must contain 3D cut scenes and interfaces. Below is a mock up video I created in flash, displaying how my interface will work and look.
I plan to create a 3D video loop to replace the image on the main menu this includes the animated clouds, the sky, cliffs and the Orc corpse on the floor. Some ideas I had to add more animations are to add a ribbon of cloth to the handle of the sword that will flutter in the wind, a slow first person camera wobble to emulate the view of a tired characters point of view, and possibly birds flying past or animated blood flow coming out of the dead Orc. The buttons will not be included in the 3D production, the darkness and lighting effects will also not be included in the 3D production as these are added later in flash. So the 3D image will brighter than shown below.
Due to blogger video upload issues I am adding the video as a Youtube link:
https://www.youtube.com/watch?v=irB3X_hsXRk
Subscribe to:
Comments (Atom)